CentOS Nexus 目录结构
/usr/download/nexus/
	nexus-3.8.0-02-unix.tar.gz  # Download 源码包
	nexus-3.8.0-02
		bin
			nexus	# Shell 脚本
			nexus.vmoptions # JVM 参数
		etc
			nexus-default.properties # 默认配置
		...
	sonatype-work # 工作空间
		nexus3
			log	# 各种日志, 默认是空文件夹
			...
源码部署运行
Nexus 开源版本 Download 页面: https://www.sonatype.com/download-oss-sonatype


cd /usr/download

mkdir nexus

cd nexus

wget https://sonatype-download.global.ssl.fastly.net/nexus/3/nexus-3.8.0-02-unix.tar.gz

tar -zxvf nexus-3.8.0-02-unix.tar.gz

ll

	nexus-3.8.0-02-unix.tar.gz
	nexus-3.8.0-02 包含 Nexus 的运行环境和应用程序
	sonatype-work  包含配置和数据 (日志...)

cd nexus-3.8.0-02/bin

ll

./nexus

	WARNING: ************************************************************
	WARNING: Detected execution as "root" user.  This is NOT recommended!
	WARNING: ************************************************************
	Usage: ./nexus {start|stop|run|run-redirect|status|restart|force-reload}

less nexus.vmoptions

	-Xms1200M
	-Xmx1200M
	-XX:MaxDirectMemorySize=2G
	-XX:+UnlockDiagnosticVMOptions
	-XX:+UnsyncloadClass
	-XX:+LogVMOutput
	-XX:LogFile=../sonatype-work/nexus3/log/jvm.log
	-XX:-OmitStackTraceInFastThrow
	-Djava.net.preferIPv4Stack=true
	-Dkaraf.home=.
	-Dkaraf.base=.
	-Dkaraf.etc=etc/karaf
	-Djava.util.logging.config.file=etc/karaf/java.util.logging.properties
	-Dkaraf.data=../sonatype-work/nexus3
	-Djava.io.tmpdir=../sonatype-work/nexus3/tmp
	-Dkaraf.startLocalConsole=false

cd ..

cd etc

ll

less nexus-default.properties

	## DO NOT EDIT - CUSTOMIZATIONS BELONG IN $data-dir/etc/nexus.properties
	##
	# Jetty section
	application-port=8081
	application-host=0.0.0.0
	nexus-args=${jetty.etc}/jetty.xml,${jetty.etc}/jetty-http.xml,${jetty.etc}/jetty-requestlog.xml
	nexus-context-path=/

	# Nexus section
	nexus-edition=nexus-pro-edition
	nexus-features=\
	 nexus-pro-feature

cd ..

cd bin

./nexus run


netstat -lntp # 查看有没有 8081 端口的监听

jps -lv # 或者执行该命令查看有没有 nexus 的进程服务


日志位于: sonatype-work/nexus3/log
JVM配置位于: nexus-3.8.0-02/bin/nexus.vmoptions
Nexus 默认配置位于: nexus-3.8.0-02/etc/nexus-default.properties (含 端口:8081)
日志监控
cd /usr/download/nexus/sonatype-work/nexus3/log

tail -n 200 -f jvm.log
tail -n 200 -f karaf.log
tail -n 200 -f nexus.log
tail -n 200 -f request.log

注意: 一定要看日志, 那样遇到问题可以快速关注到并去着手解决
Admin 访问登录
访问 http://IP:8081/

Admin 默认登录账号: admin 密码: admin123

添加角色
	点击 "设置" 按钮
	点击 Users --> Create user 添加角色
	注意 Roles, 这里没有细化权限管理, 所以就直接将 nx-admin 和 nx-anonymous 都选中吧
新建角色 访问登录
点击 "设置" 按钮
	点击 Repositories --> Create repository 添加 releases 和 snapshots 两个仓库
		Repositories --> Create repository --> Select Recipe 中选择 maven2(hosted) --> Create Repository: maven2 (hosted)
		注意:
			1. Maven 2 的 Version pollcy 选择
				创建 releases 库的时候, Maven 2 的 Version pollcy 选择 Release
				创建 snapshots 库的时候, Maven 2 的 Version pollcy 选择 Snapshots
			2. Hosted, 将 Deployment pollcy 由 Disable redeploy 改为 Allow redeploy

(releases 和 snapshots 为自定义仓库)

Repositories 页面 copy 得到
	releases : http://IP:8081/repository/releases/
	snapshots : http://IP:8081/repository/snapshots/
Maven 配置
D:\apache-maven-3.5.2\conf\setting.xml 配置

  <!-- Nexus 私服 -->
  <servers>
	<server>
	  <id>releases</id>
	  <username>xiaojianjian</username> <!-- Create user 添加角色的账号 -->
	  <password>xiaojianjian</password> <!-- Create user 添加角色的密码 -->
	</server>
	<server>
	  <id>snapshots</id>
	  <username>xiaojianjian</username>
	  <password>xiaojianjian</password>
	</server>
  </servers>

  <!-- 阿里云镜像 -->
  <mirrors>
	<mirror>
	  <id>aliyun-nexus</id>
	  <mirrorOf>central</mirrorOf>
	  <name>Aliyun Nexus</name>
	  <url>http://maven.aliyun.com/nexus/content/groups/public</url>
	</mirror>
  </mirrors>
项目 pom.xml 配置
<!-- Nexus 私服 -->
<distributionManagement>
    <repository>
        <id>releases</id>
        <url>http://IP:8081/repository/releases/</url>
    </repository>
    <snapshotRepository>
        <id>snapshots</id>
        <url>http://IP:8081/repository/snapshots/</url>
    </snapshotRepository>
</distributionManagement>

<build>
    <plugins>
        <plugin>
            <groupId>org.apache.maven.plugins</groupId>
            <artifactId>maven-surefire-plugin</artifactId>
            <configuration>
                <skip>true</skip>
            </configuration>
        </plugin>

        <plugin>
            <groupId>org.apache.maven.plugins</groupId>
            <artifactId>maven-source-plugin</artifactId>
            <executions>
                <execution>
                    <id>attach-sources</id>
                    <goals>
                        <goal>jar</goal>
                    </goals>
                </execution>
            </executions>
        </plugin>
    </plugins>
</build>
项目生成部署
项目执行 mvn clean install deploy -Dmaven.test.skip=true
(
发布的是 releases 还是 snapshots 由项目 pom.xml 的 version 版本号是否以 -SNAPSHOT 判断标识
多模块项目升级版本号步骤
1. 修改`pom.xml`, 升级`parent`版本号
2. 修改子模块
2.1 手动修改所有子模块的依赖
2.2 运行`mvn versions:update-child-modules -DgenerateBackupPoms=false`, 更新其子项目的依赖
3. Import Changes
)
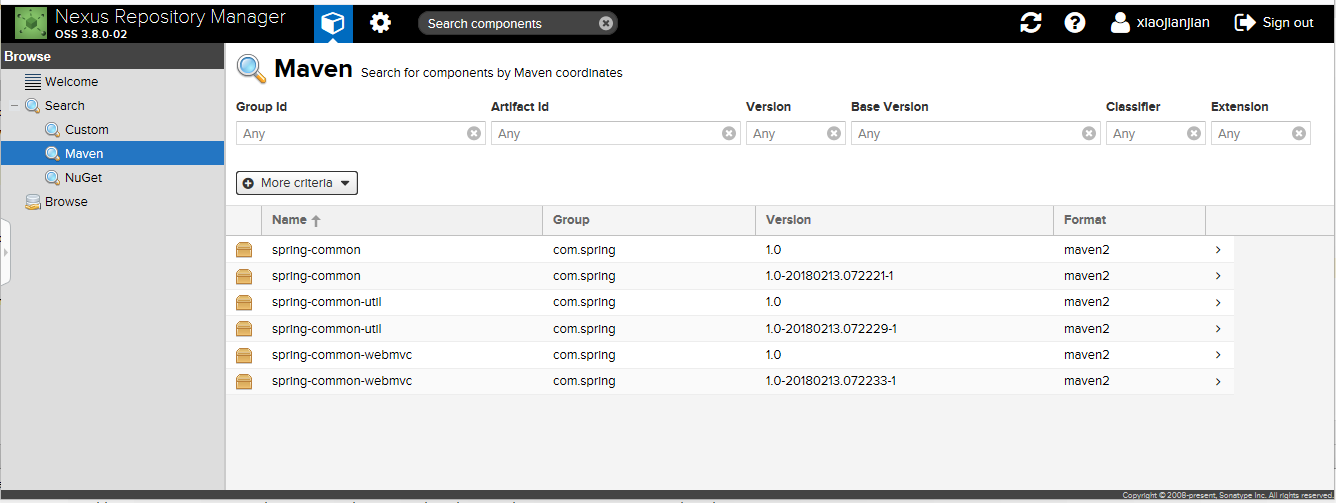
访问 http://IP:8081/#browse/search/maven 查看有没有构建部署记录
部署记录效果图
遇到问题
1. 部署到 snapshots 仓库时, jar 包会带上时间戳, 不过这没影响, Maven 会自动获取相应版本最新的 jar 包
	由 maven-metadata-local.xml 中会记录 lastUpdated 时间戳

2. Failed to execute goal org.apache.maven.plugins:maven-deploy-plugin:2.8.2:deploy (default-deploy) on project my-test: Failed to deploy artifacts: Could not transfer artifact...from/to release...
	部署到 release 仓库时, 相同版本的 jar 包不能提交
	原因是因为 release 的部署策略是 Disable redeploy, 不允许覆盖更新组件
	解决办法:
		1. 修改一下版本号, 不重复版本即可提交
		2. 拥有管理权限的话在 Repositories 将对应的 仓库 的 Deployment pollcy 由 Disable redeploy 改为 Allow redeploy

3.
	[ERROR] Failed to execute goal org.apache.maven.plugins:maven-deploy-plugin:2.8.2:deploy (default-deploy) on project spring-common: Failed to retrieve remote metadata com.spring:spring-common:1.0-SNAPSHOT/maven-metadata.xml: Coul
	d not transfer metadata com.spring:spring-common:1.0-SNAPSHOT/maven-metadata.xml from/to snapshots (http://123.207.53.152:8081/repository/snapshots/): Failed to transfer file: http://123.207.53.152:8081/repository/snapshots/com/s
	pring/spring-common/1.0-SNAPSHOT/maven-metadata.xml. Return code is: 400 , ReasonPhrase:Repository version policy: RELEASE does not allow metadata in path: com/spring/spring-common/1.0-SNAPSHOT/maven-metadata.xml. -> [Help 1]
	[ERROR]
	[ERROR] To see the full stack trace of the errors, re-run Maven with the -e switch.
	[ERROR] Re-run Maven using the -X switch to enable full debug logging.
	[ERROR]
	[ERROR] For more information about the errors and possible solutions, please read the following articles:
	[ERROR] [Help 1] http://cwiki.apache.org/confluence/display/MAVEN/MojoExecutionException

	注意: Return code is: 400 , ReasonPhrase:Repository version policy: RELEASE does not allow metadata in path

	有好几种情况会影响到:
		1. 自建 Repository 仓库必须是 Hosted 的
		2. 自建 Repository 仓库必须将 Deployment pollcy 由 Disable redeploy 改为 Allow redeploy
		3. 自建 Repository 仓库的 Version pollcy, xx-release 的 Version pollcy 选择 Release, xx-snapshots 的 Version pollcy 选择 Snapshots
		4. 项目 mvn deploy # 默认使用 0.0.1-SNAPSHOT 版本号发布到 snapshots 库

4.
	...
Maven 命令
mvn clean # 将 target 下的文件清除
mvn install #
	本地仓库默认路径: C:\Users\{电脑用户}\.m2\repository\...
mvn deploy -Dmaven.test.skip=true #

...
镜像仓库
中央仓库
	http://mvnrepository.com/
	http://search.maven.org/

阿里云镜像
	http://maven.aliyun.com/nexus/
Maven Plugin
Apache Maven Deploy Plugin : http://maven.apache.org/plugins/maven-deploy-plugin/

Apache Maven Release Plugin : http://maven.apache.org/maven-release/maven-release-plugin/index.html

...
第三方 jar 上传
mvn deploy:deploy-file -DgroupId=com.alipay.api -DartifactId=alipay-sdk -Dversion=149 -Dpackaging=jar -Dfile=alipay-sdk-java20180213135026.jar -Dsources=alipay-sdk-java20180213135026-source.jar -Durl=http://IP:8081/repository/releases/ -DrepositoryId=releases